+353 (74) 911 9664

How to Install UFO High Bay LED Lights
Installing UFO High Bay LED Lighting: A Step-by-Step Guide
UFO high bay LED lights, recognized for their distinctive round shape and low-profile design, offer brilliant and efficient lighting solutions for expansive indoor areas like warehouses, factories, sports facilities, and retail stores. These lights serve as superior alternatives to conventional metal halide or fluorescent high bay lights, thanks to their energy efficiency, extended lifespan, and superior lighting quality.
In this guide, we will walk you through the process of installing UFO high bay LED lights, ensuring you're well-prepared and safe throughout the installation.
Step 1: Selecting the Ideal UFO High Bay LED Lights
Prior to installation, it's crucial to pick the most suitable UFO high bay LED lights for your specific requirements. Key considerations include:
- Lumen Output: Lumens measure the brightness of the light. The ideal lumen output is contingent on your area's size, ceiling height, and intended use. Generally, 10-20 lumens per square foot are recommended for lower ceilings (below 20 feet), while 20-40 lumens per square foot are better for higher ceilings (above 20 feet).
- Energy Consumption (Wattage): Wattage indicates how much energy the light uses. Lower wattage means reduced energy consumption. Typically, 100-150 watts are suitable for lower ceilings, and 150-400 watts for higher ceilings.
- Color Temperature: Measured in Kelvin (K), this determines the light's hue, from warm (yellow) to cool (blue) tones. The choice depends on your preference and the activities in the area. Commonly, 3000K-4000K is used for a warm ambiance, and 5000K-6500K for a brighter, cooler effect.
- Beam Angle: This indicates how wide the light spreads. A narrower beam (60°-90°) is ideal for focused lighting, while a wider beam (120°-150°) suits broader coverage.
You can find these specifications on the product page or the light's label. Online tools and consultations with lighting professionals can also assist in making the best choice. 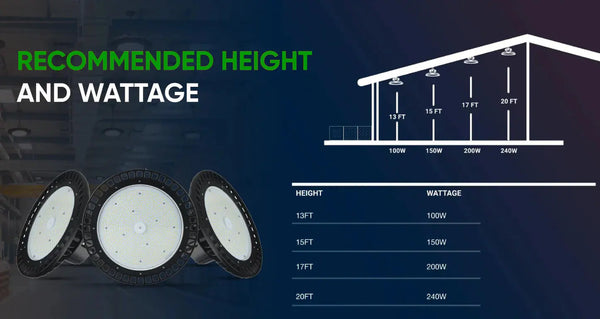
Step 2: Gathering Your Tools and Materials
Once you've selected the appropriate lights, gather the necessary tools and materials for installation:
- UFO high bay LED lights: Available for purchase on our website.
- Mounting hardware: Often included with the lights; if not, they're available separately.
- Electrical wiring: For connecting the lights to your power source.
- Safety equipment: A sturdy ladder or lift, and appropriate safety gear.
- Installation tools: Screwdrivers, drills, pliers, wire strippers, connectors, and electrical tape.
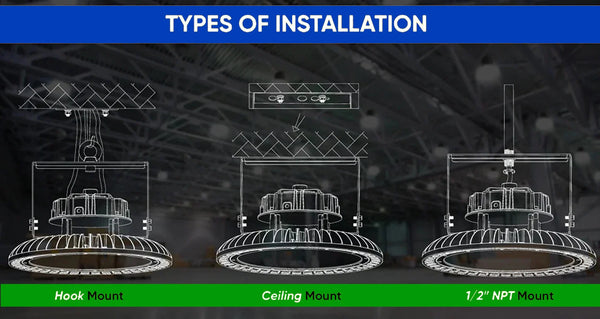
Step 3: Install the Mounting Brackets or Hooks
The next step is to install the mounting brackets or hooks to the ceiling or the existing fixtures where you want to install the UFO high bay LED lights. You need to:- Power Safety: Before you start the installation, you need to turn off the power to the existing fixtures or the circuit where you want to install the UFO high bay LED lights. You can use a voltage tester to make sure the power is off.
- Remove Existing Fixtures: If you are replacing the existing lights, you need to remove them carefully and disconnect the wires. You can use a screwdriver, pliers, and wire nuts to do this. Make sure you dispose of the old lights properly and recycle them if possible.
- Mark Installation Points: Use a tape measure, level, and pencil to mark where the hardware will go, adhering to the spacing and height guidelines for your chosen lights.
- Drill the holes: You need to drill the holes for the mounting brackets or hooks. You can use a drill and a drill bit to do this. Make sure you use the right size and type of drill bit for the material of the ceiling or the existing fixtures.
-
Attach the mounting brackets or hooks: You need to attach the mounting brackets or hooks to the ceiling or the existing fixtures. You can use a screwdriver and screws to do this. Make sure you tighten the screws securely and align the mounting brackets or hooks properly.
Step 4: Setting Up the UFO High Bay LED Lights
The final step is to install the UFO high bay LED lights to the mounting brackets or hooks:
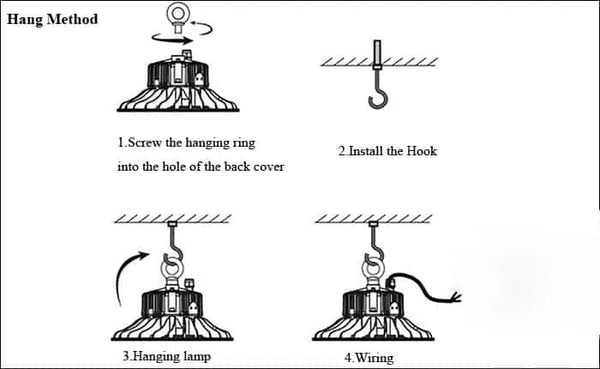
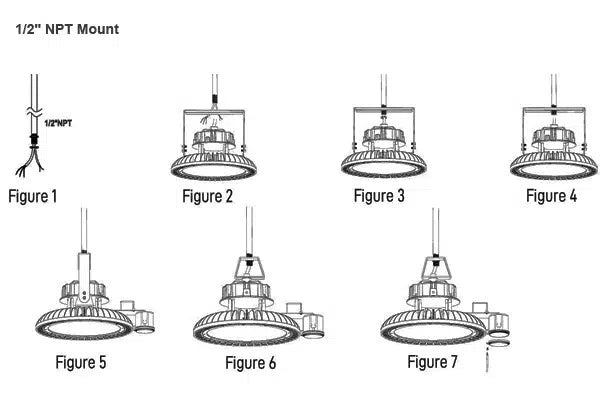
- Attach the Lights: You need to hang the UFO high bay LED lights to the mounting brackets or hooks. You can use the hook-type mounting or the eyelet-type mounting, depending on the type of UFO high bay LED lights and the type of mounting brackets or hooks. Make sure you hang the UFO high bay LED lights securely and evenly, and adjust the angle if needed.
- Wire Connections: You need to connect the power cord or wire of the UFO high bay LED lights to the power source. You can use the plug-type connection or the hard-wire connection, depending on the type of UFO high bay LED lights and the type of power source. Make sure you follow the wiring diagram and the color code, and use a wire stripper, wire nuts, and tape to make the connections. Make sure you cover the exposed wires and secure the connections.
- Power Test: After you have installed and connected the UFO high bay LED lights, you need to turn on the power and test the lights. You can use a switch or a remote control to do this. Make sure the UFO high bay LED lights are working properly and provide the desired light output and quality.

Congratulations on successfully installing your UFO high bay LED lights! Enjoy the enhanced lighting in your space. For any queries or assistance, reach out to us at hello@ledex.ie or call +353 74 916 8625
We're here to help. Thank you for choosing Ledex for your LED lighting needs.
UFO High Bay LED Lights


100W NEW TITAN LED UFO High Bay Light CCT
Original price
€36,55
-
Original price
€36,55
Original price
€36,55
€36,55
€36,55
-
€36,55
Current price
€36,55
The NEW 100W TITAN Professional LED UFO High Bay delivers efficiency, reliability, and durability for industrial and commercial spaces. With 3CCT s...
View full details
Original price
€36,55
-
Original price
€36,55
Original price
€36,55
€36,55
€36,55
-
€36,55
Current price
€36,55
Sold out


200W ENDURANCE LED UFO High Bay with OSRAM Chip 4000K
Original price
€116,50
Original price
€116,50
-
Original price
€116,50
Original price
€116,50
Current price
€68,25
€68,25
-
€68,25
Current price
€68,25
CLEARANCE WHILE STOCK LAST! The 200W ENDURANCE LED High Bay UFO combines high performance and energy efficiency, powered by an advanced Osram Chip ...
View full details
Original price
€116,50
Original price
€116,50
-
Original price
€116,50
Original price
€116,50
Current price
€68,25
€68,25
-
€68,25
Current price
€68,25
Sold out


100W FRANCE LED UFO High Bay with OSRAM Chip 4000K
Original price
€68,20
Original price
€68,20
-
Original price
€68,20
Original price
€68,20
Current price
€34,59
€34,59
-
€34,59
Current price
€34,59
Clearance sale The 100W FRANCE LED High Bay UFO, featuring advanced OSRAM CHIP DURIS E2835 technology, combines exceptional 145 Lm/W efficiency wit...
View full details
Original price
€68,20
Original price
€68,20
-
Original price
€68,20
Original price
€68,20
Current price
€34,59
€34,59
-
€34,59
Current price
€34,59
Sale


200W NEW TITAN LED UFO High Bay Light CCT
Original price
€61,90
-
Original price
€61,90
Original price
€61,90
€61,90
€61,90
-
€61,90
Current price
€61,90
The NEW 200W TITAN Professional LED UFO High Bay delivers efficiency, reliability, and durability for industrial and commercial spaces. With 3CCT s...
View full details
Original price
€61,90
-
Original price
€61,90
Original price
€61,90
€61,90
€61,90
-
€61,90
Current price
€61,90


150W NEW TITAN LED UFO High Bay Light CCT
Original price
€50,90
-
Original price
€50,90
Original price
€50,90
€50,90
-
€50,90
Current price
€50,90
The NEW 150W TITAN Professional LED UFO High Bay delivers efficiency, reliability, and durability for industrial and commercial spaces. With 3CCT s...
View full details
Original price
€50,90
-
Original price
€50,90
Original price
€50,90
€50,90
-
€50,90
Current price
€50,90


100W 150W 200W ENDURANCE LED UFO High Bay
Original price
€86,15
-
Original price
€86,15
Original price
€86,15
€86,15
-
€86,15
Current price
€86,15
The ENDURANCE LED UFO High Bay provides high-efficiency lighting with adjustable power settings of 100W, 150W and 200W, delivering 140 lm/W for bri...
View full details
Original price
€86,15
-
Original price
€86,15
Original price
€86,15
€86,15
-
€86,15
Current price
€86,15


150W Dimmable SHARK LED UFO High Bay 4000K
Original price
€126,00
Original price
€126,00
-
Original price
€126,00
Original price
€126,00
Current price
€63,00
€63,00
-
€63,00
Current price
€63,00
CLEARANCE WHILE STOCK LAST! The 150W SHARK LED High Bay UFO, equipped with OSRAM Chips and LUMILEDS SMD2835 diodes, delivers bright 4000K illuminat...
View full details
Original price
€126,00
Original price
€126,00
-
Original price
€126,00
Original price
€126,00
Current price
€63,00
€63,00
-
€63,00
Current price
€63,00
Sale


200W Dimmable NEW ITALY LED UFO High Bay with PHILIPS Driver
Original price
€107,77
-
Original price
€107,77
Original price
€107,77
€107,77
-
€107,77
Current price
€107,77
The 200W NEW ITALY LED High Bay Light offers powerful, efficient lighting with an impressive 170Lm/W output, producing 34,000 lumens. Equipped with...
View full details
Original price
€107,77
-
Original price
€107,77
Original price
€107,77
€107,77
-
€107,77
Current price
€107,77
Sold out


150W ENDURANCE LED UFO High Bay with OSRAM Chip 4000K
Original price
€86,15
Original price
€86,15
-
Original price
€86,15
Original price
€86,15
Current price
€43,89
€43,89
-
€43,89
Current price
€43,89
Clearance sale The 150W ENDURANCE LED High Bay UFO, powered by OSRAM Chip technology, offers exceptional 4000K neutral lighting with a high CRI >...
View full details
Original price
€86,15
Original price
€86,15
-
Original price
€86,15
Original price
€86,15
Current price
€43,89
€43,89
-
€43,89
Current price
€43,89
Sale


120W-100W-80W Industrial LED UFO High Bay GERMANY Philips Xitanium Driver 3CCT 1-10V Dimmable
Original price
€0,00
-
Original price
€0,00
Original price
€0,00
€84,98
€84,98
-
€84,98
Current price
€84,98
The UFO GERMANY Industrial LED High Bay is a powerful and efficient lighting solution designed for demanding industrial environments. Featuring a P...
View full details
Original price
€0,00
-
Original price
€0,00
Original price
€0,00
€84,98
€84,98
-
€84,98
Current price
€84,98